Apple AppAttest Integration
This section covers the integration between Approov and Apple's AppAttest feature. If this integration is used then the Approov SDK forces the iOS device to perform a valid AppAttest attestation in addition to all of the other verifications performed by Approov. This provides an additional level of protection against any spoofing attempts, whilst hiding the integration complexity of using AppAttest on the backend.
Approov includes a full server side integration as detailed for AppAttest. If any of the AppAttest checks fail then valid Approov tokens are not generated for the iOS device. Support is provided for rate limiting AppAttest attestations and to perform optional fraud checks using information from Apple servers.
AppAttest assertion checks are also performed on subsequent Approov fetches from the device, ensuring the continued legitimacy of the device. This uses keys held in the secure enclave of the device, ensuring that the requests are really coming from the same device that passed the original AppAttest attestation.
Apple's AppAttest is only supported from iOS 14. If you allow your app to be installed on earlier versions of iOS then they will not be protected by AppAttest. You might want to consider using DeviceCheck as well as, or instead of AppAttest, since it is supported on many devices from iOS 11.
If this option is used then the iOS Approov SDK must make calls to create a new key pair and then attest its origin with Apple. This needs to be done on the first Approov fetch after launching the app for the first time. Performing this operation requires additional network connection(s) and CPU processing time, over which the Approov SDK has no control. This can substantially delay the fetch operation on the iOS platform by adding up to 2500ms of additional latency.
AppAttest Status Flags
The status of the AppAttest will be reflected in the device property flags:
appattest-appid-fail: iOS device has completed an AppAttest attestation but app is not registered.appattest-apple-err: Indicates a problem using the Apple fraud lookup endpoint, possibly due to an invalid AuthKey. Use theapproov appattest -getcommand to perform a check on the validity of the key provided.appattest-assert-performed: iOS device has just performed an AppAttest assertion.appattest-attest-performed: iOS device has just performed an AppAttest attestation.appattest-completed: iOS device has completed (now or previously) an AppAttest attestation.appattest-failed: iOS device has failed an AppAttest attestation or assertion, or app is unregistered or fraud risk exceeds threshold.appattest-high-risk: iOS device has completed an AppAttest attestation but fraud risk exceeds threshold.appattest-unavailable: iOS AppAttest was attempted but it was unavailable. This will occur on devices running a version of iOS 13 or lower, or devices without a suitable hardware enclave (such as simulators).
These flags are used in various Rejection Policies to determine if a valid Approov token should be issued. By default, obtaining an AppAttest result is not mandatory. However, if the option flag require-appattest is enabled the all iOS devices must perform AppAttest or else they will be rejected with failed-requirement. This may mean that some older iOS devices may fail.
If are you using the option require-appattest and there was a problem getting or processing an AppAttest token then subsequent Approov token fetches will make further attempts. If you are not using the option then no further attempts will be made until the app is restarted.
AppAttest Environment Setting
In order to use AppAttest in production (or to use the optional fraud lookup facility at all) you must add the AppAttest Environment capability and entitlement into your app.
Firstly you need to register a new, or modify an existing, app identifier with the AppAttest capability. Log into your Apple account and navigate to the Identifiers section. If creating a new Identifier, press the + and go through the steps of the wizard to create a new App ID. Select the AppAttest capability, along with any others you need, as follows:
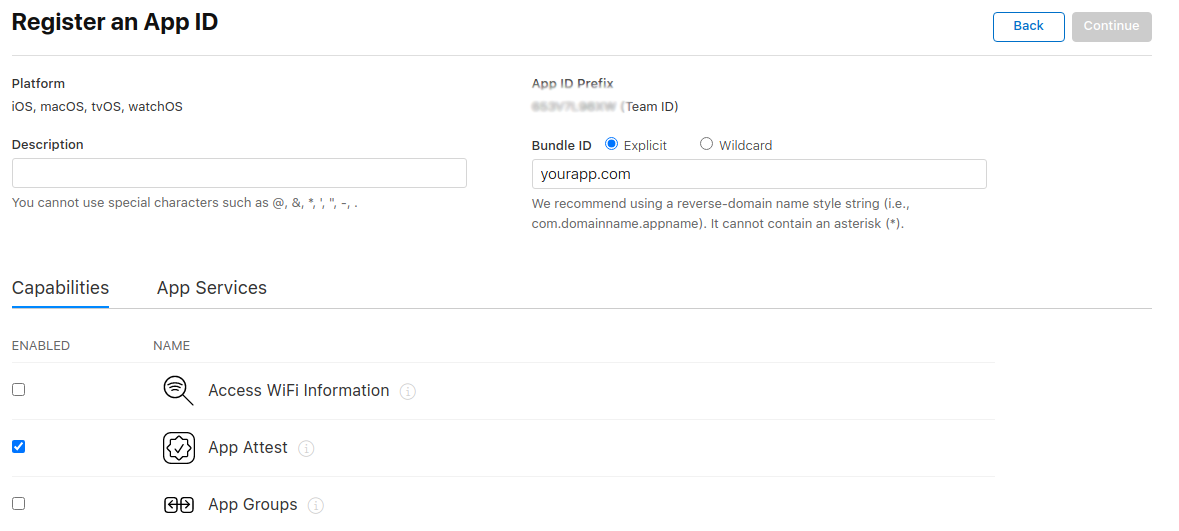
Note that you must provide a specific Bundle ID, it is not possible to add a capability when using a wildcard.
It is then necessary to add the required entitlement in your app's .entitlements file, as follows:

The file holds key/value pairs. Ensure you set the value type to a String and then set it to either development or production. Remember to change the value to production before issuing your app to the App Store.
Enabling AppAttest
AppAttest is enabled by specifying the Apple team ID used for your apps, as follows:
approov appattest -addTeamID YYYYYYYYY
You will need an admin or delegate role and confirmation to make this change:
WARNING: this will have an immediate impact on your apps in production
ATTENTION: If you wish to continue then please type YES and return: YES
AppAttest team ID added
The TeamID can be found by logging into your Apple account, and you will have been provided with it during the AppAttest Environment Setting step. Alternatively, go to Certificates, Identifiers & Profiles and your team ID is shown on the upper right on the web page. It is a 10-digit alphanumeric code. The Team iD is also shown when you use Approov to register one of your iOS apps.
Note that in order to obtain valid AppAttests you must have at least one app registered with the correct Bundle ID and Team ID. If not then the AppAttest will fail with the appattest-appid-fail flag. You can clear this by Registering a suitable app. Note that you can see the information collected by AppAttest by Getting Specific Device Information under the appattest-app-id key.
AppAttest can be disabled, if an admin or delegate role is available, as follows:
approov appattest -remove
Confirmation is required:
WARNING: this will have an immediate impact on your apps in production
ATTENTION: If you wish to continue then please type YES and return: YES
AppAttest disabled
This will disable all future usage of AppAttest attestations or assertions on your account.
The persisted AppAttest state for any devices that have conducted an AppAttest attestation will be retained. This persisted state may still cause Approov rejections due to the last AppAttest result. If you wish to completely remove any persisted state, then consider Clearing All Device State.
Getting AppAttest Status
The status for AppAttest can be be viewed at any point using:
approov appattest -get
Which will provide the setup parameters such as:
TeamID: YYYYYYYYY
KeyID: XXXXXXXXXX
AssertionPeriod: always
RateLimit: unlimited
If you have provided the optional KeyID to support fraud lookup and it is not possible to authorize with the Apple servers then you will see WARNING: Apple Authorization Error with the message from the Apple servers.
Controlling AppAttest Assertion Rate
Once a full AppAttest attestation has been completed for a device, subsequent Approov fetches are protected using an AppAttest assertion. This signs some challenge data provided by the Approov server with the private key in the secure enclave created in the initial attestation step. This proves that the request is being handled by the same device since it is not possible to extract the private key from the secure enclave.
An assertion is a much quicker operation than the original attestation, taking of the order of 200ms rather than around 2500ms for the original attestation. By default the assertion repeat period is considered to be always so all Approov fetches include an assertion, and thus require additional processing time of approximately 200ms.
If this additional delay is problematic for your application's responsiveness then you can elect to use a slower assertion period, specified in hours, as follows:
approov appattest -setAssertionPeriod 1
You require an admin or delegate role and confirmation to make this change:
WARNING: this will have an immediate impact on your apps in production
ATTENTION: If you wish to continue then please type YES and return: YES
AppAttest assertion period set
In this case this means that a new assertion is only performed if it has been an hour or more since the last one, thus reducing the latency of any intervening Approov fetches. Remember that these fetches will continue to be protected by all the usual Approov protections against request spoofing. You can reset the period back to always if required.
Note that an assertion is always performed on the first Approov fetch after a new launch of the app.
Rate Limiting AppAttest Attestations
An AppAttest attestation is performed, on all devices that support it, on the very first Approov fetch after the first launch of the app. This might be problematic if you have a very large app user base and are just enabling AppAttest, or you have very large numbers of new users. This is because the Apple documentation infers that Attestation requests from the device might be throttled if the load is very high (see Onboard Users Gradually in Preparing to Use the App Attest Service). No specific maximum numbers are provided by Apple.
By default AppAttest rates are not limited by Approov, but it is possible to set a rate limit as follows:
approov appattest -setRateLimit 1000
An admin or delegate role and confirmation is required to do this:
WARNING: this will have an immediate impact on your apps in production
ATTENTION: If you wish to continue then please type YES and return: YES
AppAttest rate limit set
The value is the maximum number of new AppAttest requests per hour. If this rate is exceeded then subsequent new app launches during the period will not perform an AppAttest. This is delayed until the next time the app is launched, and if the rate is below the threshold. You can disable the rate limit by specifying unlimited. Note you should not use the strict rejection policy with this option, otherwise devices that failed to perform an AppAttest due to the rate limit will be unable to get valid Approov tokens.
Adding Apple Fraud Lookups
If you add a DeviceCheck key then Approov will automatically do a fraud lookup using an Apple endpoint and reject devices that exceed a user specified risk level. Get a DeviceCheck Key to enable this access and add it as follows:
approov appattest -addAuthKey AuthKey_XXXXXXXXXX.p8
You will need an admin or delegate role and confirmation to do this:
WARNING: this will have an immediate impact on your apps in production
ATTENTION: If you wish to continue then please type YES and return: YES
AppAttest fraud lookup authorization added
The parameter AuthKey_XXXXXXXXXX.p8 is the private key file you downloaded. Now that this information is added to your Approov account, the Approov cloud servers are able to contact the Apple servers and assess fraud risk for all new AppAttests performed.
The fraud check guards against an attack where a single compromised device may be used to spoof many individual devices. The fraud lookup provides a metric based on the approximate count of AppAttest attestations performed on a particular device for your app. Since this is held in the secure enclave of the device it is extremely hard for an attacker to spoof this. A high value might indicate fraud associated with the device. By default, apps with a risk metric of higher than 25 are rejected, but you can set your own maximum risk metric.
In order to use the fraud lookup facility you must set the AppAttest Environment entitlement, even if you are still performing development in the sandbox. You will receive an appattest-apple-err if you haven't done this.
You may remove the fraud lookup for new AppAttests as follows:
approov appattest -removeAuthKey
Again, you will need an admin or delegate role and provide confirmation to do this:
WARNING: this will have an immediate impact on your apps in production
ATTENTION: If you wish to continue then please type YES and return: YES
AppAttest fraud lookup authorization removed
Setting Maximum Fraud Risk
You can vary the maximum acceptable fraud risk as required. The risk metric grows with user reinstalls of your app, restores from a backup, or transfers of a device between users. The metric may also grow if you use the facility to clear all device state as this causes a new attestation key pair to be generated on the device.
If an individual device exceeds the maximum risk metric then it will fail with the appattest-high-risk flag set.
The Apple provided risk metric values have no specific thresholds and you will need to experiment with a suitable threshold, as described in Accessing Fraud Risk in the Interpret the Metric section.
You can see the risk metric collected by AppAttest by Getting Specific Device Information under the appattest-risk-metric key. You could collect information for devices failing with high risk by adding a filter on appattest-high-risk and then analyzing a sample of the captured results.
You can adjust the maximum acceptable fraud risk metric value as follows:
approov appattest -setMaxRisk 10
You will need an admin or delegate role and confirmation to do this:
WARNING: this will have an immediate impact on your apps in production
ATTENTION: If you wish to continue then please type YES and return: YES
AppAttest max risk set
The new value will be used to assess both new and previously performed AppAttest attestations.