Platform Specific
An option is provided called auto registration and, if this is applied, then all apps signed with that certificate are effectively registered automatically and there is no need to use per-app registration at all.
If you are signing an app for release then the signing key and associated certificate will generally be managed by the Google development portal, and you can download the public key certificate from there. The Apple portal also manages all of the signing certificates for individual developers associated with the account.
It is not possible to use App Signing certificate registration for applications distributed through the Apple App Store, or for use in TestFlight. In these cases, the app is re-signed before distribution using an Apple certificate that is shared across many apps from multiple publishers. Instead, please register your app with Approov using the approov registration command. Note that unversioned registrations allow you to register all versions of an application that use the same release of the Approov SDK.
On Android, a local keystore file may hold the keys for signing locally on a development machine and these may also need to be added to allow Approov to recognize development versions of apps.
By default a maximum of 25 different signing certificates may be added to the account to allow apps with different signing certificates. These may be from different developer accounts, allowing them to be supported in a single Approov account. Moreover, if you upgrade or change your app signing certificate you should keep the old one in the Approov account as there will be installed versions of your app still using it.
Android App Signing Certificates
Generally all Android apps are signed. There are two different options for how the signing keys are stored and managed:
- Locally: Local keys may be held in an Android Studio managed keystore.
- Google Managed: Google Play Signing allows Google to manage your signing keys. This means that the app package delivered to your users will be signed by the certificate held in the Google cloud. Releases made via an Android Application Bundle are always signed in this way, but it is also possible to release APKs that are Google Play Signed, as explained in this guide.
App signing certificates added to Approov are used to verify the provenance of apps. They are also used if you utilize the Play Integrity integration options to check the certificate hash provided in the token.
Adding the signing certificate to Approov only ever adds the public key information for verification purposes. The private key used in the app signing process is never accessible to Approov.
The public key of the certificate allows the signed digest of your full app content to be verified. Recreating a valid signature for a modified app requires access to the private key associated with the certificate, which is inaccessible except to Google. Approov supports the signature algorithms in the list of signature algorithm IDs on the Android Open Source Project's web site. The Approov SDK does an analysis of the app signature as part of its analysis to ensure that only your app is able to obtain a valid Approov token.
Adding Android App Signing Certificate From Portal
An app signing certificate will be available in your Google Play console. Log in and navigate to the release management section for your app. You will see a screen similar to the following:
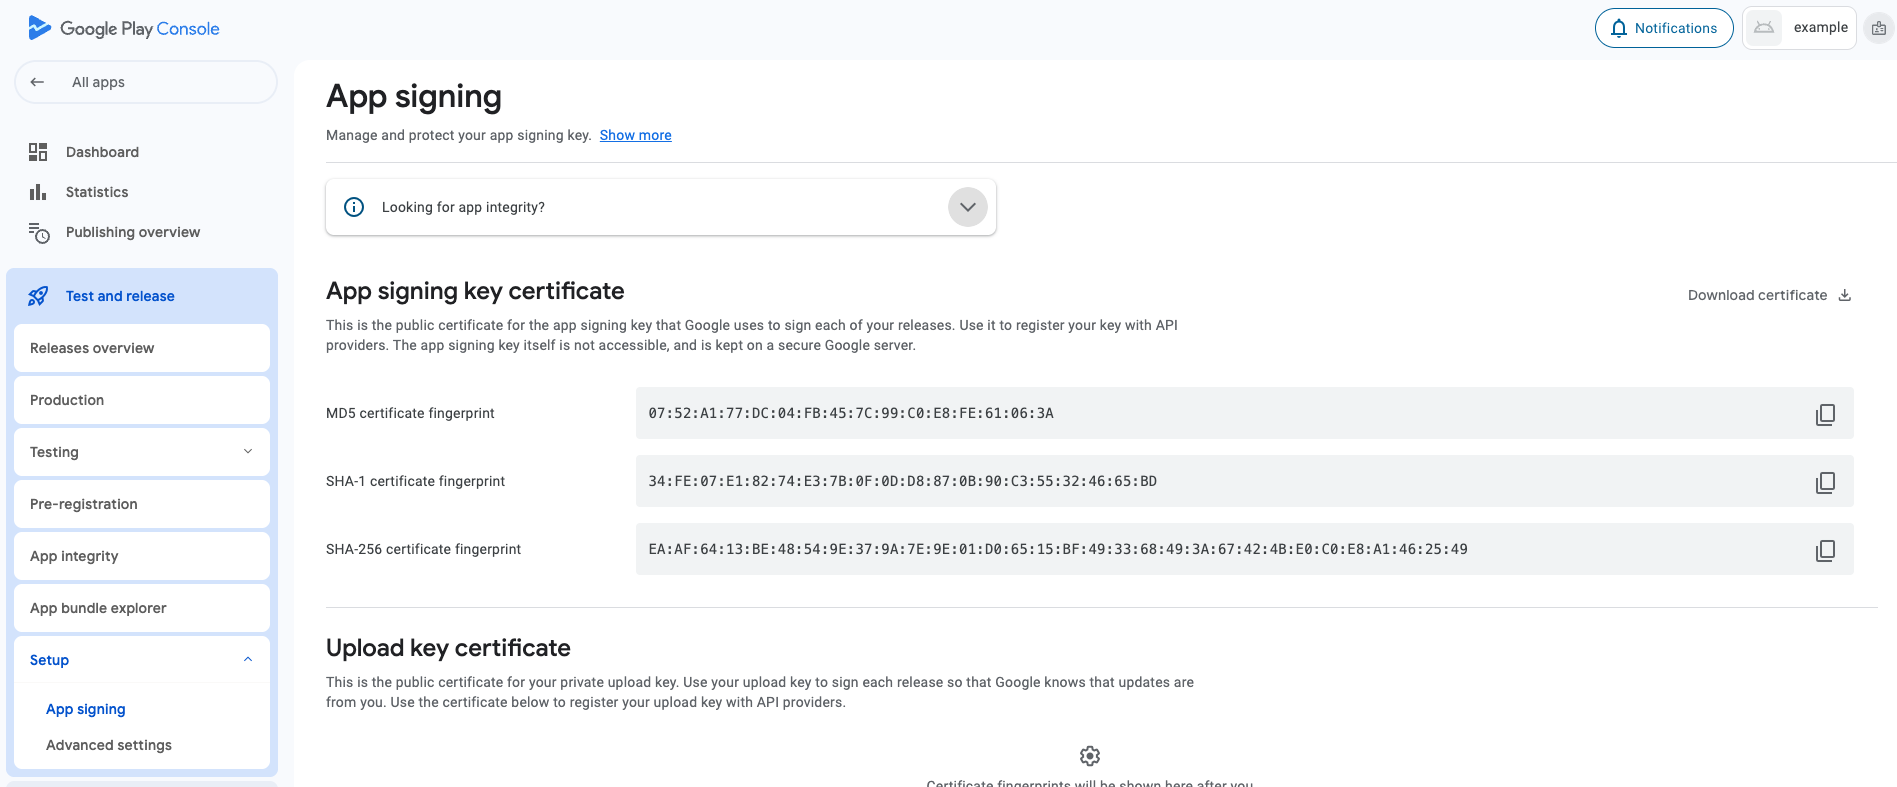
The section Setup, subsection App Integrity and tab App signing shows the signing certificate that is currently active, and its hash in various forms. Download the .der certificate file by clicking on the Download Certificate button. Save it as app-signing-cert.der, or some other convenient name. Note that there is no risk of key compromise by doing this since it is a public certificate and the private key is not included.
You can add the signing certificate to Approov with the following command:
approov appsigncert -add app-signing-cert.der -autoReg
This will output the fingerprint hash of the certificate added such as:
successfully added C0:F3:15:9B:A5:6C:A8:E1
This adds the certificate to those that are known by Approov. The optional -autoReg option adds the auto-registration property for the certificate so there is no need to add individual registrations for apps signed with this certificate.
The first 8 bytes of the SHA256 hash of the certificate are shown in hex. This matches the first 8 bytes of the value SHA-256 certificate fingerprint shown in the Google Play Console. Other certificate metadata and the expiry date are also output.
If you are sharing app bundles or APKs internally then this will use a different app signing certificate. In this case you must download this internal test certificate and also add it to Approov using approov appsigncert -add for these test apps to be valid.
Adding Android App Signing Certificate From Keystore
For local development the private key will be held in a binary file called a Java keystore (with a .jks or .keystore file extension). This can be used to hold the private signing key on your development machine, along with the public certificate for verification.
The following commands exports the debug certificate from its standard location when using Android Studio. The keystore can actually be in one of two different formats, depending on your machine setup. Since Java 9 (introduced in September 2017) the default keystore format is PKCS12. Prior to that the default format was JKS. The commands for importing are slightly different between the two formats. If you don't know what format is used then simply experiment until the file is recognized.
For PKCS12 the command is:
approov appsigncert -add $HOME/.android/debug.keystore -storePassword android -autoReg
Please modify the keystore location to match the key store you are using (the one shown above is the default location for Android Studio). This command also assumes an encrypted file with the default password of android. Finally this uses the auto registration option to automatically recognize all apps signed with the certificate, If you don't use this option, you will need to register valid apps individually.
For JKS format the command is:
approov appsigncert -add $HOME/.android/debug.keystore -alias androiddebugkey -autoReg
Please modify the keystore location to match the key store you are using (the one shown above is the default location for Android Studio). A JKS file may hold multiple keys and this command uses the default Android Studio debug key of androiddebugkey. If you don't know the key alias then use any information output from an error that lists all the key aliases available in the file. Finally this uses the auto registration option to automatically recognize all apps signed with the certificate, If you don't use this option, you will need to register valid apps individually.
In all cases, the command outputs the fingerprint hash of the certificate added such as:
successfully added 2F:9B:E0:7B:6C:A4:D0:FC
Keep in mind that the number of app signing certificates in Approov is limited to 10 by default. Sharing of debug or development keystores amongst a development group is advised. Please contact Approov support if you need this limit to be increased. See Enabled Features and Limits for how to view the limit configured in your account.
Ensuring Android Apps are Suitably Signed
If you are running apps on a device or simulator using the Run button in Android Studio then the APK installed on the device might not be signed by default. Note that the reference documentation Sign your debug build indicates it should be signed, so you should check this for your installation.
If your debug build for running is not signed then, even with auto-registration enabled, Approov will be unable to recognize your app and will fail attestation. If you are able to obtain the APK from the device you can check it with:
approov registration -checkSigType app-debug.apk
This example checks app-debug.apk and shows if it contains a V2 Signature Scheme or later, which contains an APK signing block and allows the use of the app signing certificates feature.
You can update the application .gradle file to ensure all debug APKs are signed as follows:
signingConfigs{
    debug{
        keyAlias 'androiddebugkey'
        keyPassword 'android'
        storeFile file('<home-dir>/.android/debug.keystore')
        storePassword 'android'
    }
}
buildTypes {
    debug{
        signingConfig signingConfigs.debug
    }
}
The above configuration assumes a typical Android Studio configuration with a JKS format file and with the keystore located in the user's home directory. Modify this as appropriate for your use case.
The key used can then be Added to Approov.
For automatic signing of releases see Configure the build process to automatically sign your app.
Testing Android App Bundles
It is not necessary to go through the Play Store console to test using an app bundle with Approov. You can use Android Studio Build -> Build Bundle(s)/APK(s) -> Build Bundle(s) to build an app bundle which will be automatically signed with the debug key from your debug keystore. You can use Build -> Generate Signed Bundle / APK... to build an app bundle and sign it with a key from another key store.
Locate the signed app bundle you have just built and follow the bundletool instructions on Generate a set of APKs from your app bundle and Deploy APKs to a connected device to deploy the app bundle to a test device.
For Approov to recognize app bundles built and deployed in this way, the key used must be Added to Approov.
Adding Android App Signing Certificates From App
It is possible to add an app signing certificate extracted directly from a signed .apk application file. It is convenient to use this option if it is not clear which particular app signing certificate is in use for your Android application.
Firstly obtain the apk that is currently installed on a device by finding out the installation path:
adb shell pm path <your-package-name-defined-in-Manifest>
This should output the apk location on the device. Pull the the apk file to a local computer using adb:
adb pull "/data/app/~~-nE2-j-opqG-D3HAbSJfSQ==/com.yourpackage.app-dqDeQoqf8IByPEjAz58MDg==/base.apk"
Use the apksigner utility shipped with the Android build-tools that verifies and prints the apk signatures which is usually available in the ~/Library/Android/sdk/build-tools/build-tools-version folder and print the certificates:
apksigner verify --print-certs-pem base.apk
This should print a list of certificates that can be identified by the Certificate DN as belonging to a particular enterprise. There can be entries related to Google and Android but at least one certificate will belong to the organization or developer responsible for signing the apk which is the one we are interested in. Select and copy the relevant certificate including the lines -----BEGIN CERTIFICATE----- and -----END CERTIFICATE----- and save them to a file with a .pem extension. The final step consists on converting the .pem file to a .cer by using the following command:
openssl x509 -outform DER -in org-file.pem -out org-file.cer
You can then add the certificate to your account by issuing the following command:
approov appsigncert -add org-file.cer
Adding Huawei App Signing Certificates From Portal
This section is only relevant if you are registering an app that is being released to the Huawei AppGallery using an Android Application Bundle (AAB). This means that it is using Huawei AppGallery App Signing where the app package delivered to your users will be signed by a certificate held in the Huawei AppGallery.
In order to use Huawei AppGallery app signing with Approov you need to inform Approov about the app signing certificates that you use. These are stored in your Approov account so it is only if you add a new certificate or revoke an old one that you will need to complete this step again. An app signing certificate proves that a particular installed app package has been issued by Huawei via your account. The public key of the certificate allows an encrypted digest of your full app content to be verified. Recreating a valid signature for a modified app requires access to the private key associated with the certificate, which is inaccessible except to Huawei.
The app signing certificate is available in Huawei AppGallery Connect. Log in and navigate to the App Signing section for your app. You will see a screen similar to the following:
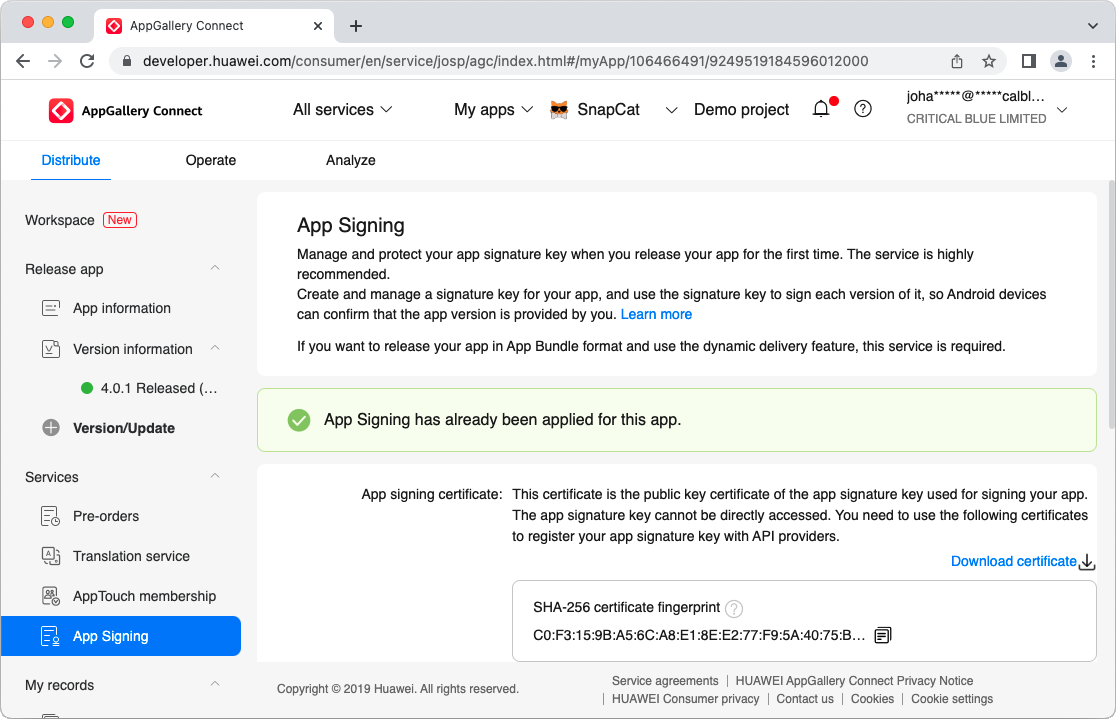
The section App signing certificate shows the signing certificate for the app and its SHA-256 hash. Download the public certificate file by clicking on Download certificate. It will be saved as certificate.pem.
You can then add the fixed and converted app signing certificate to Approov with the following command:
approov appsigncert -add certificate.pem -autoReg
This will output the fingerprint hash of the added certificate such as:
successfully added C0:F3:15:9B:A5:6C:A8:E1
This adds the certificate to those that are known by Approov and enables auto-registration for it. The first 8 bytes of the SHA256 hash of the certificate are shown in hex. This matches the value SHA-256 certificate fingerprint shown in AppGallery Connect.
Adding Apple App Signing Certificates From Portal
It is not possible to use App Signing certificate registration for applications distributed through the Apple App Store, or for use in TestFlight. In these cases, the app is re-signed before distribution using an Apple certificate that is shared across many apps from multiple publishers. Instead, please register your app with Approov using the (approov registration)[/security-configuration/managing-registrations/app/#registering-an-app] command. Note that (unversioned registrations)[/security-configuration/managing-registrations/management/#unversioned-registrations] allow you to register all versions of an application that use the same release of the Approov SDK.
You should add the signing certificate used to sign iOS or watchOS apps for development only. These are available in your Apple development account portal. Go to the initial screen showing program resources:
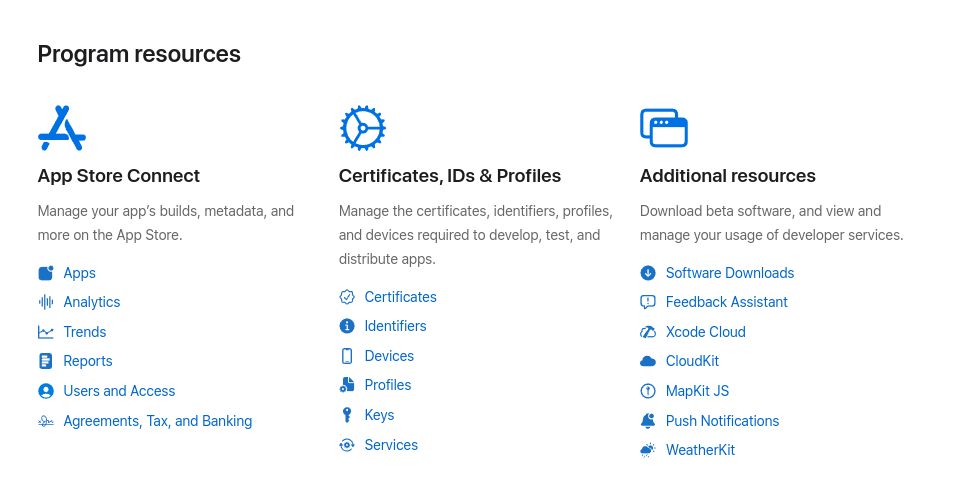
Click on Certificates and you will be presented with the full list of development and distribution certificates for the account. Click on the certificate being used to sign iOS/watchOS applications from your particular Xcode installation and you will be presented with the following dialog:
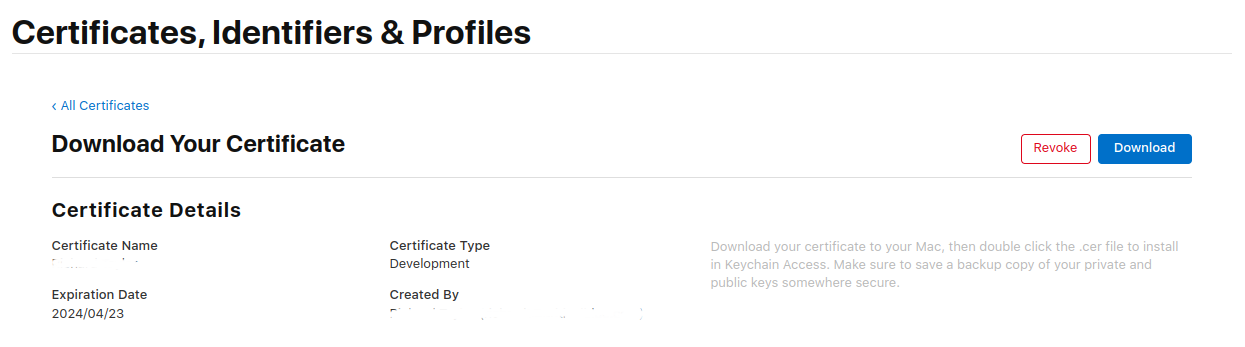
The downloaded certificate only includes the public key information used to verify an app's authenticity. The private key used in the app signing process is never accessible to Approov.
Now click on the Download button and a file with a .cer extension is downloaded, e.g. development.cer. You can then add the app signing certificate to Approov with the following command:
approov appsigncert -add development.cer -autoReg
This adds the certificate to those that are known by Approov and enables auto-registration for it. It will output the fingerprint hash of the certificate added such as:
successfully added FA:C5:E7:78:2B:DB:86:B1
The fingerprint is the first 8 bytes of the SHA256 hash of the certificate shown in hex.
Apps built to run on the iOS/watchOS simulator are not code signed and thus auto-registration does not work for them. In this case you can consider forcing a device ID to pass to get a valid attestation.
This auto registration feature only works if you are using an SDK version 3.1.0 or above.
Adding Apple App Signing Certificates From App
It is possible to add an app signing certificate extracted directly from a signed .app application file. It is convenient to use this option if it is not clear which particular app signing certificate is in use for your Xcode configuration.
Firstly you need an xcarchive package for the whole app generated when you select the Archive option in Xcode's Product menu (if the Archive option is greyed out, you need to modify your target by setting the destination to be Any iOS device since targeting a simulator device disables archiving). Once the archive operation finishes, you will see the Organizer window similar to the one below:
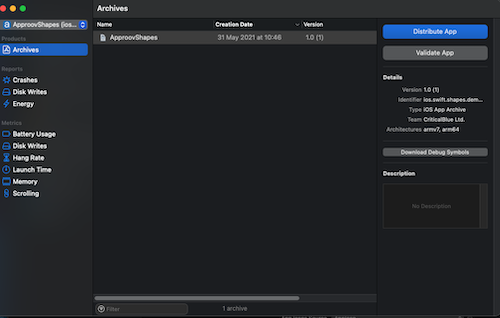
Xcode has archived the source files and linked the libraries by producing an xcarchive file which is a collection of files, binaries, debug symbols and other files from which an actual app file can be obtained by following these steps:
- Right click and select
Show in Finder - Right click on the
.xcarchivefile and selectShow Package Contentsin the popup menu - The finder will switch to showing the contents of the `.xcarchive`` file
- Navigate to
Products/Applications - Your
.appwill be located inProducts/Applications(it will be shown without a file extension) - Copy and paste this file to a suitable location (let's assume it is called
YourApp.app)
You can then extract the certificates directly from this app package using the codesign tool that is installed with Xcode. Execute the following:
codesign -d --extract-certificates YourApp.app
This wil extract the certificates as files in the local directory, typically codesign0, codesign1 and codesign2. The first file is the one that contains your leaf signing certificate and this is typically the one that you want to add. To use this with the Approov CLI you must rename it with a .cer file extension as follows:
mv codesign0 codesign0.cer
You can then add the app signing certificate to Approov with the following command:
approov appsigncert -add codesign0.cer -autoReg
This adds the certificate to those that are known by Approov and enables auto-registration for it. It will output the fingerprint hash of the certificate added such as:
successfully added FA:C5:E7:78:2B:DB:86:B1
The fingerprint is the first 8 bytes of the SHA256 hash of the certificate shown in hex.
Apps built to run on the iOS/watchOS simulator are not code signed so it is not possible to extract the certificates from them. In this case you can consider forcing a device ID to pass to get a valid attestation.
This auto registration feature only works if you are using an SDK version 3.1.0 or above.