Implementation
If you have a single API which accepts requests from both the web and mobile channels, then you may appreciate the ability to have shared code for granting access to protected data. The Approov flow has been extended with a facility for integrating other web protection services to enable this.
Approov wraps web protection service results and the Approov service performs the web protection service call normally performed by your backend API. In the Approov configuration you define the duration of an Approov session which is the time period during which a web protection service result, once obtained, should be considered to be valid. During an Approov session no new web protection service results need to be requested, but instead many (short-lived) Approov tokens that contain the original web protection service result can be obtained from the Approov service. This is underpinned by a refresh token, valid for the duration of the Approov session, that is used by the Approov web SDK internally. The Approov service ensures that valid Approov tokens can only be obtained from the browser session that made the initial Approov token request that included the web protection result by using the Demonstrating Proof of Possession (DPoP) protocol. The Approov web SDK can generate a DPoP which that you can, optionally, include in requests to your API in order to provide confidence that the browser session that requested the Approov token is the one that is sending the web API request and that the request has not been intercepted and modified.
The server-side flows of several, best in class, browser solutions have been integrated into Approov to communicate their results back to browsers wrapped in an untamperable Approov token. At a minimum, this enables a single simple token check in the backend API to authorize access. However, if required, Approov can be configured to embed the full results of the integrated protection to allow for deeper interrogation.
There is support for the following web protection services:
- Fingerprint: Fingerprint provides a powerful mechanism for fingerprinting the browser environment of a user and deriving a visitor ID based on both the raw fingerprint and the history of prior visits for that user. This visitor ID can then be compared against a user identity in the backend API system to determine if they match. If they do, then there is a high probability that it is indeed the correct user and operations can proceed. If not, then this may indicate an attempt at account takeover or simply that the user has moved to a different browser environment. In either case, additional verification steps should be introduced into the flow to protect the user’s account.
- Google reCAPTCHA: Google reCAPTCHA is a popular service for determining if a browser is being operated by a human. A browser first retrieves a token from the reCAPTCHA API which is then passed to the protected API as part of a request. A query, from the protected API, obtains the full set of results associated with the token and uses this to determine whether to accept or reject its request.
- hCaptcha: hCaptcha is another popular service for determining if a browser is being operated by a human. To get started, it provides a solution that is a near drop-in replacement for Google reCAPTCHA, however, it also provides further configuration options which extend the capabilities and/or customize behavior. Beyond this, there is also an hCaptcha Enterprise tier.



To use an integration, you must sign up for the associated service but then follow modified instructions for using those services described in the associated section under Implementing the Integrated Services Flow.
Just because you can doesn't mean you should. The primary Approov service can provide a very strong indication that a request originates from an untampered instance of your app running on a user device. The integrated web services are not attempting to solve this issue directly and therefore cannot provide the same level of confidence, even if combining multiple integrations. (Even without a specific attack, the built in debug facilities of browsers make it too easy for users to copy tokens, or other data, that a service provider would prefer to be kept private.) As such, we recommend that you restrict critical API endpoints to only work from the Mobile App. The solution presented here, supports this: after successfully verifying a token signature, you can always look at the token claims to determine if it was issued for the web or mobile channel and use that to inform your access control logic.
In some cases, it may be necessary to have a more involved access check. For example, the mobile app token includes a did (DeviceID) claim that uniquely identifies the particular install of an app. If required, the protected API can associate this ID with a user’s account. Such an association can then be checked on each API request to identify those requests that don't match and then highlight them as having a heightened risk of fraud. The mismatch can be used to trigger additional security steps that determine if the difference is caused by an attempt to misuse the credentials from another valid app instance, or because the legitimate account owner is logging in from a different mobile device.
In the web-flow we can achieve the same kind of check by embedding the results of a Fingerprint server API query in the Approov token. This exposes the Fingerprint visitorID to the backend API, enabling the same kind of association as the DeviceID and a corresponding security flow when a new visitorID is identified for a user. A similar binding is also possible using the user identifiers available to enterprise level hCaptcha customers. In a similar vein, the Google reCAPTCHA or hCaptcha services can be used to provide confidence that requests have not been scripted.
Web Protection Flow
The combined Mobile and Web flows are shown in the following diagram:
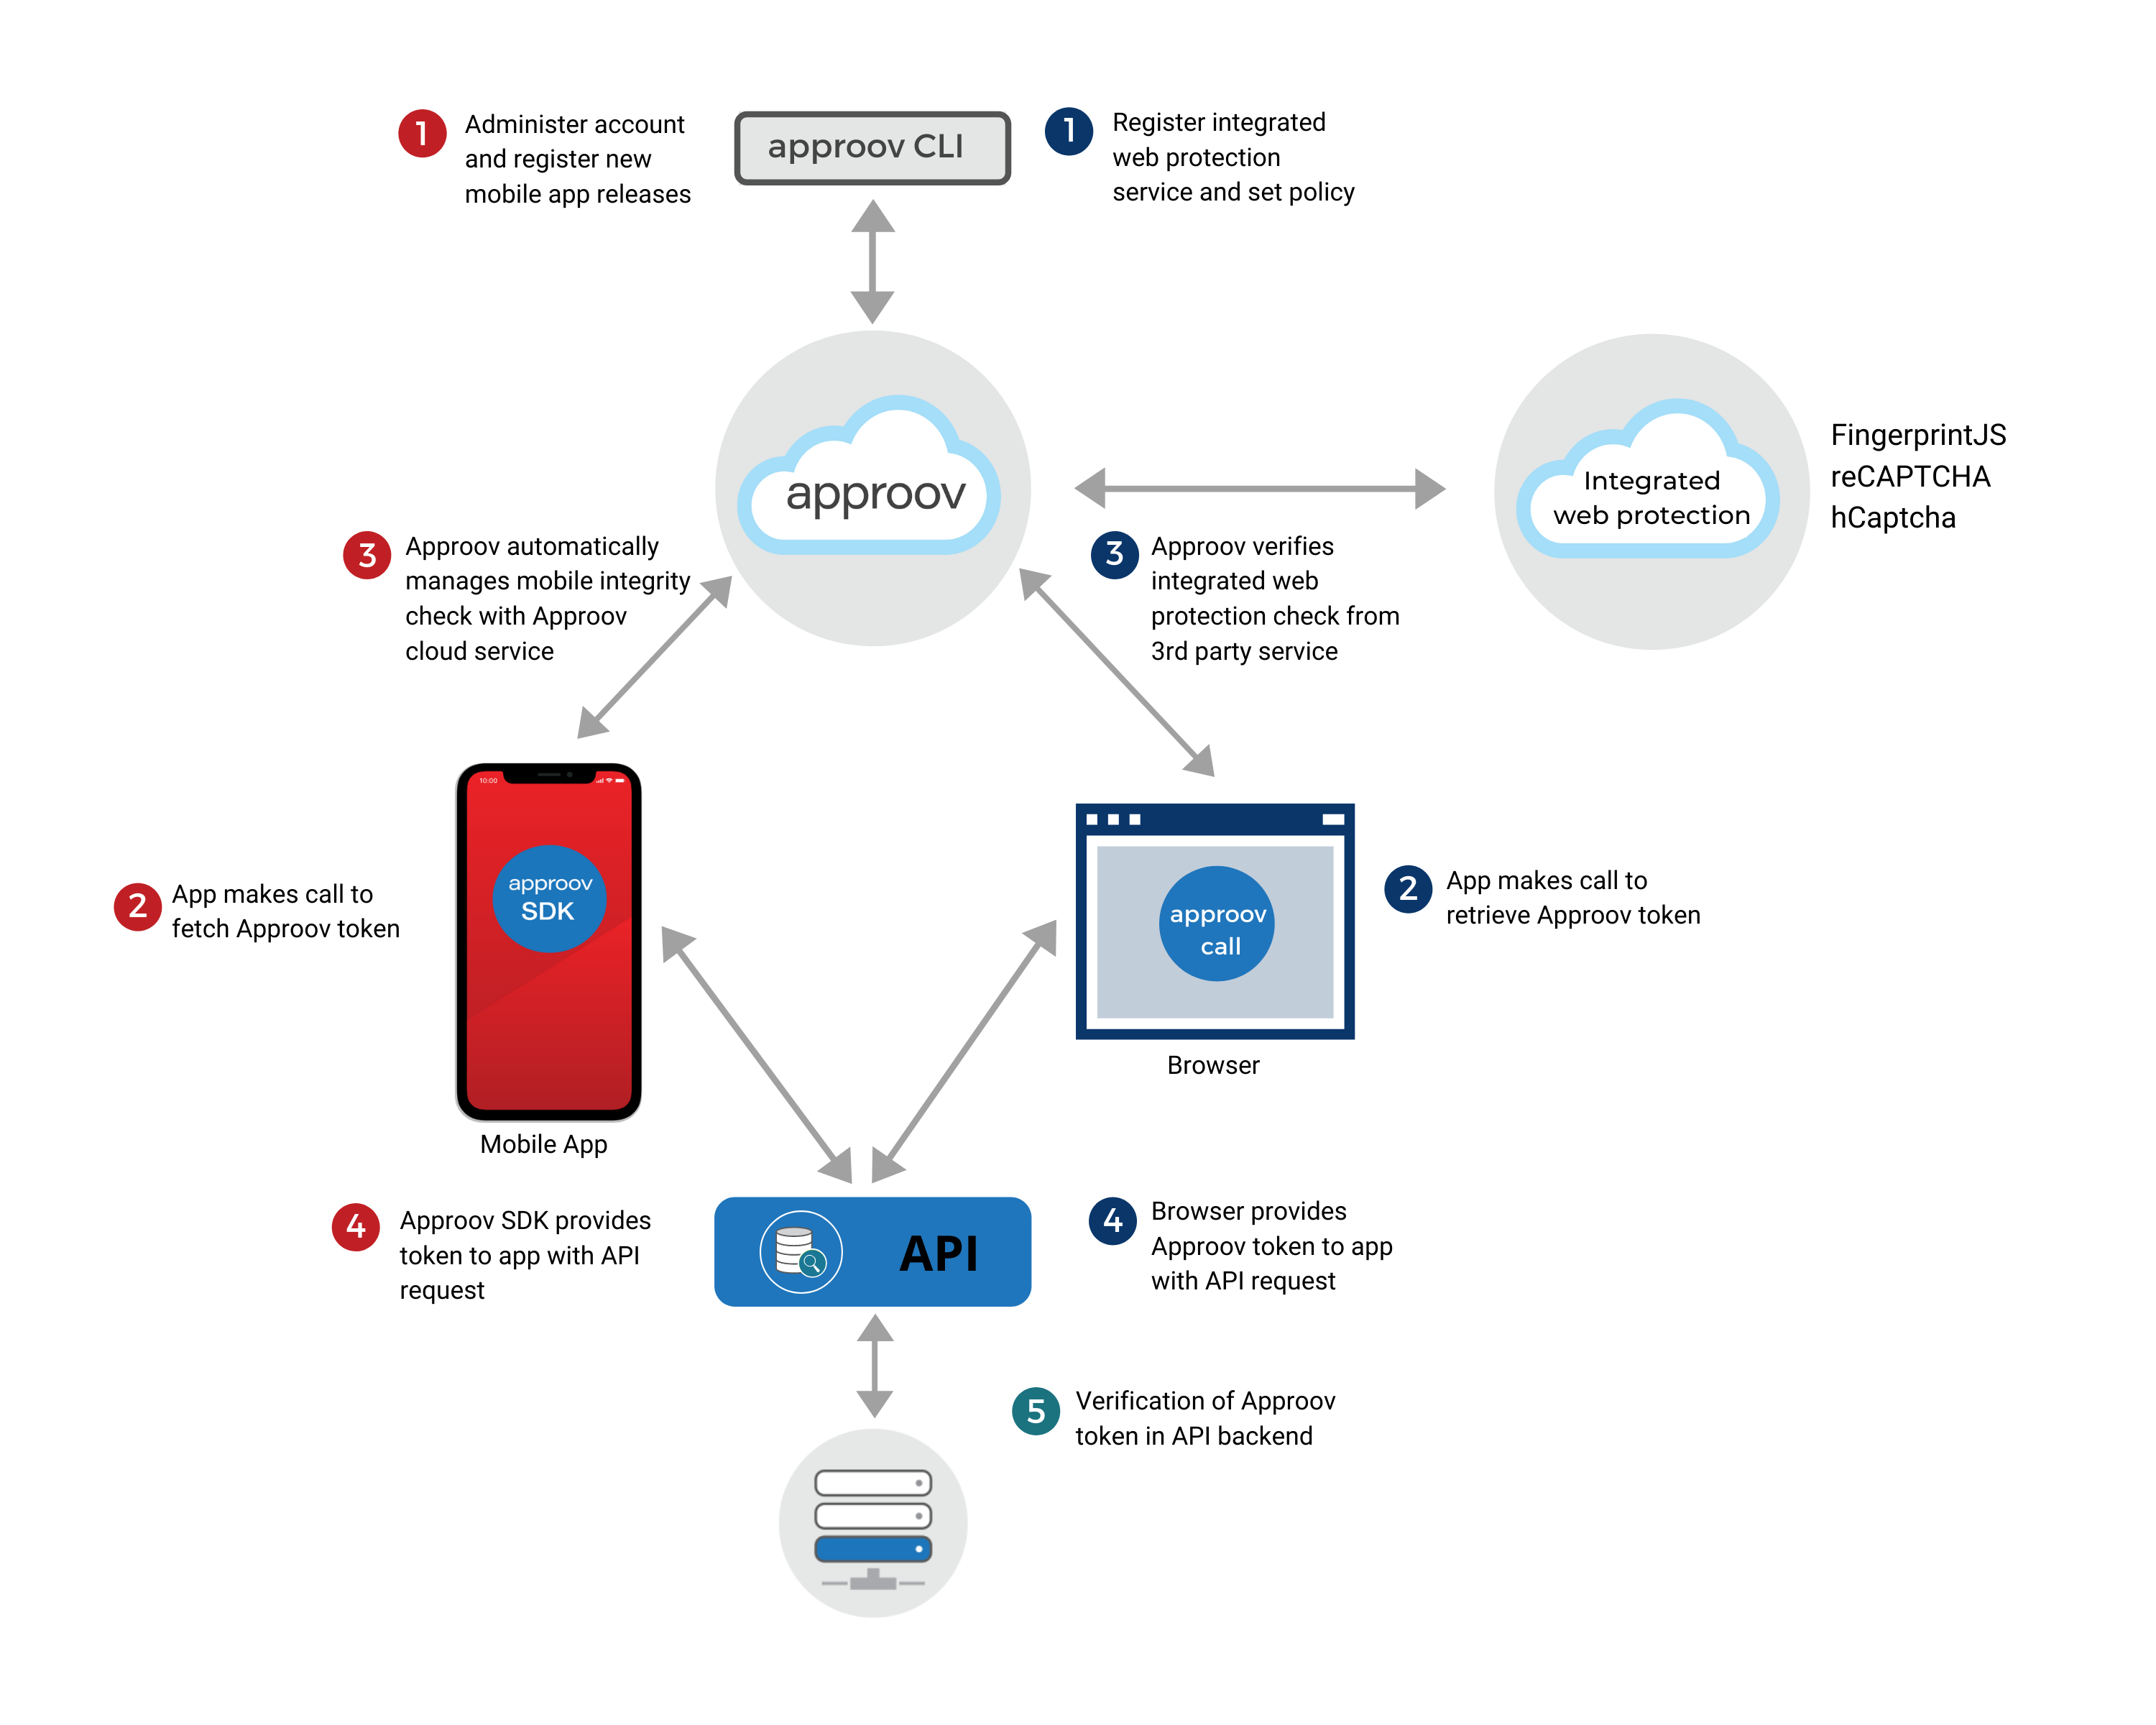
- Mobile App Flow
- Web Protection Flow
The left side of the diagram illustrates the primary Approov mobile app protection flow:
1 The mobile app is integrated with the Approov SDK and registered with the Approov service.
2 & 3 When the app is to make a call to a protected backend API, it first fetches an Approov token from the Approov SDK. The SDK performs a complex integrity measurement process to prove that the app is genuine and running in an uncompromised environment. This operation is performed in conjunction with the Approov cloud service. If the app passes the various tests then it is provided with a short lived Approov token.
4 The Approov token is sent as part of the API request to the protected backend API.
5 The backend API includes an Approov token check. Any requests not including a valid Approov token are rejected.
The right side of the diagram shows the parallel web protection flow, with one or more integrations in place and using a common backend API:
At least one of the supported services must be integrated into the web application, Fingerprint, Google reCAPTCHA, or hCaptcha. Each of these requires a service specific account to be set up which is subject to their own pricing terms.
1 The Approov CLI is used to register the integrated protection subscriptions/sites with the Approov service and to perform other configuration.
The agent code for the integrated protection(s) is added to the web site by following the instructions for the associated service. The web-side of the integrated protection check should be initiated prior to an API call by following the associated docs.
2 To retrieve an Approov token, an Approov session is initialized and an initial token fetch request is made to the Approov service with the results from the integrated protection call. Subsequent Approov token fetches made during an Approov session do not require the inclusion of a web protection service result. When an Approov session expires, new WPS results need to be obtained to start a new Approov session. Note that it is possible to combine multiple integrated protections, for example Fingerprint with Google reCAPTCHA or hCaptcha. In that case, all associated parameters are passed in a the initial Approov token fetch call.
3 The initial token fetch request causes a lookup to be made from the Approov servers to the integrated protection servers, using the provided parameters.
A correctly signed (very) short-lived Approov token is only returned if all configured integrated protection services return valid responses. The Approov token will include a claim indicating that it was issued for the web-flow and, by default, a minimal set of properties from the integrated protection response. Approov can be configured to include the full integrated protection response, however this requires that the generated Approov tokens be encrypted as some values in the responses are sensitive. An invalid Approov token will be returned if any of the checks for the integrated protections fail. (An error response is also possible.)
4 & 5 Lastly, the Approov token is sent as part of the API request to the protected backend API in the same way as it is in the mobile app and with the same backend verification step being used to grant or deny access.
Optionally, a Demonstrating Proof of Possession (DPoP) token can be generated and included in the request to the web API in order to provide confidence that the browser that requested the Approov token is the one that is sending the web API request and that the request has not been intercepted and modified.
Implementing the Integrated Service Flow
The following steps are required to set up a web protection service.
- Modify the check in one or more of your Approov protected backend APIs to discriminate between mobile attestation and web protection
- Use the Approov CLI to enable web protection for those modified APIs
- Sign up for your chosen supported 3rd party service
- Modify your web app to call out to the selected service
- Configure your Approov account to use the service
- Insert the call to Approov, passing in the results from the selected service call
- Pass the resulting Approov token and, optionally, a DPoP token to your protected API
- View activity and billing data in your metrics portal
The first two steps, dealing with server side changes, are covered in the next section. Steps 3 through 7 are specific to the integrated service and the sections, Fingerprint, Google reCAPTCHA, and hCaptcha take you through those steps for each of the associated services, followed by a section describing how to generate and verify DPoP tokens. The section on Web Protection Metrics Presentation covers step 8 and completes the basic flow. A final section on web protection provides a reference for the web SDK and also covers more advanced topics: using multiple integrated services, obtaining tokens for multiple API calls in one request, adding token binding to your web app, and troubleshooting.
Enable Web Protection for an API
The first step is to audit the target API(s) to decide which endpoints or queries will service both web and mobile requests and those that will be unique to one or the other. As mentioned previously, web protections do not provide the same level of confidence as the Approov mobile API protection service, that a request has not been constructed by a threat actor. The table below shows the claims that can be used to distinguish between a token issued to a mobile app and one issued to a web app:
| Claim | Description |
|---|---|
did | The did claim is present in all tokens obtained from the mobile app attestation channel. It identifies the unique ID for attesting device. Testing for it's presence is the easiest way to identify tokens originating from this channel whether they come from the Primary service or from the Failover. |
embed | The embed claim is present in all tokens obtained from the web protection channel. It holds a JSON object whose keys indicate the specific web protection service, or services, that were used to obtain the token and whose values are brief summaries, or the full results, obtained from the wrapped services. If it is important to query the results obtained from the 3rd party service in your backend system, then you can also use the presence of the claim itself to determine which channel created the token. Note that, because the full web protection results may contain entries that must be kept private in order to maintain solution security, you must use encrypted tokens (JWEs) to include it in the generated Approov token. |
Note that, in either case you should first ensure that the token you have received is valid, signed in the expected way with the correct secret. See the section on Backend integrations.
If you have an existing mobile only API that you are considering opening up to the web channel, then it is imperative that you first perform some kind of end-point audit to identify those API entries that could be enabled for web-access, those that shouldn't, and those that mustn't. As mentioned previously, Approov mobile API protection provides a strong degree of confidence that requests originate from legitimate installs of your apps. This confidence cannot be reproduced for the web channel.
Use the Approov CLI to enable the web-flow for your APIs. The section on adding APIs with the Approov CLI covers all the options available when adding an API. Web protection is included in that documentation, however, in short, Approov web protection is enabled for an API when it is added with the -allowWeb flag. If you wish to enable web protection for an existing API definition you just add it again using the same parameters as before but also including the -allowWeb flag. To disable web protection, you add the API again but without the flag. Each addition of the same API, completely overwrites the previous settings for that API.
approov api -add your.domain -allowWeb
This will output something like the following and requires confirmation:
WARNING: adding the API will have an immediate impact on your apps in production.
ATTENTION: If you wish to continue then please type YES and return: YES
added API domain your.domain with type:account, alg:HS256, pin:JG29gD8vWiEanTCVPjYLQ5yiYMKQqR05OH38yFf0kBU=
enabled continuous monitoring for https://your.domain:443 (remove using `approov monitoring -removeAPI`)
To receive a token at all, all Approov token fetches must include at least the web-enabled target API. So, if you are adding your first integrated service it may be useful to first add a web-enabled development API domain that you can include in your test requests.
Note that, if you intend to embed the full results from the integrated protection server-side lookup, then you must also use encrypted tokens for the API to prevent leaking potentially sensitive data from the integrated protection. Only APIs configured to use encrypted tokens will get the full results embedded in the token. An API will use an encrypted token if it is configured to use a JWK with an encryption algorithm, or, if you use the -jwe flag, then the default encryption secret for your account will be used to encrypt tokens with the A256GCMKW algorithm:
approov api -add your.domain -allowWeb -jwe
This will output something like the following and requires confirmation:
WARNING: adding the API will have an immediate impact on your apps in production.
ATTENTION: If you wish to continue then please type YES and return: YES
added API domain your.domain with type:account, alg:HS256, pin:JG29gD8vWiEanTCVPjYLQ5yiYMKQqR05OH38yFf0kBU=
enabled continuous monitoring for https://your.domain:443 (remove using `approov monitoring -removeAPI`)
You must change your back-end server to accept the new token type before changing the token signing algorithm for your active APIs, including the addition of the -jwe flag. Ideally, the server should be altered to accept both the new and old token type while the new token format propagates through the flow.
Several sections provide details on handling APIs, secrets, and encryption: Adding API Domains, Managing Keysets, JWE Token Encryption, and Account Secret Key Export.